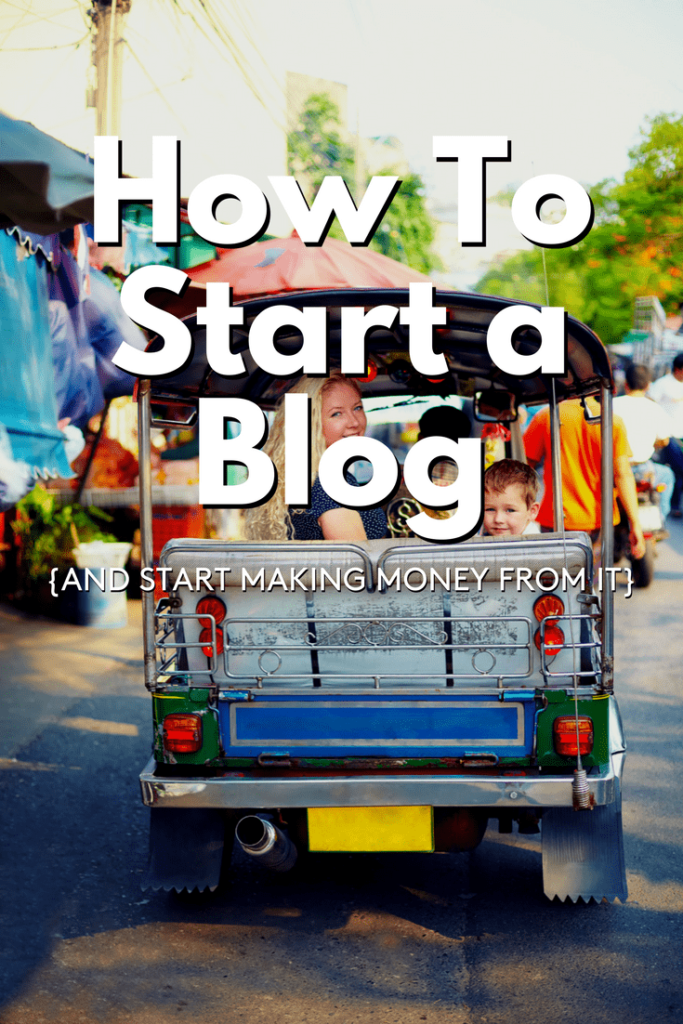
How To Start a Blog
Hi there!
Gretchen here showing you how to start a blog just like I did almost 5 years ago.
Blogging has literally changed my life. It has allowed me to stay home with my daughter, make thousands from the comfort of my own home, and work according to my own schedule. There is truly nothing like it, especially when you consider how cheap it is to start a blog.
This is what I want to share with you today: how you can start a blog. I've given you exclusive pricing and discounts below, including pricing as low as $3.95/month and a FREE domain name.
When I first started blogging, I went with a smaller, crazy inexpensive hosting company and I regretted it almost immediately. Terrible customer service, slow website speeds and more made me wish that I had used Bluehost when I started. Don't make my mistake!
Start your blog with a reputable company like Bluehost that has a great reputation for helping blogger get up and running as easy as possible.
When I say that blogging has changed my life, I mean it: I now make about $4,000 a month from my blog as you can see from my blogging income reports, and blogging has allowed my family and I to pay off $24,000 of debt in 2015, allowed me to spend more time with my daughter, and has allowed us to purchase a camper, travel, and put more money away in savings than ever before!
In 2017, I made more than $87,000, and I expect to double that in 2018.
Why Start A Blog?
Would you love to be able to work from home, travel whenever you want, choose your how spend your days, and focus your energy where you want to – not where someone else tells you to?
Having that kind of freedom would be amazing, wouldn't it?
Blogging can allow you to have that freedom!
For the first time in years, I truly love my life, and blogging has made it possible.
The amazing thing about blogging is that anyone can make money from a blog. It doesn't matter whether you have zero experience with website or blogging or if you're a technical savant, you can make back the small amount you'll pay for hosting back in just a few months. From there, the sky is the limit! You can launch books, products, and other sources of income like paid social media promotion and even speaking engagements that stem from the work you've done on your blog.
You can start a blog for as little as $3.95 per month through Bluehost. This price is available through my link, and when you purchase a hosting package for at least 12 months, Bluehost will give you a FREE domain name – a $15 value! Plus, with Bluehost, you'll never have to sign a contract.
You literally have nothing to lose.
Here are the steps to starting a blog:
- Choose Your Platform
- Hosting & Domain Name
- Design Time!
- Write Posts & Pages
- Grow Your Blog
My goal is to help you start growing your blog right away, rather than waiting month or years like many bloggers do. From years of blogging, I've found that many people abandon their blog in the beginning stages – and I don't want that to happen to you.
So I want to encourage you to take the time right now and read through this entire post. It will take you about 20 minutes, and will give you everything you need to start you blog, market your blog, and start making money!
Don't have time right now? Just enter your email, and I'll send you the 5-Day Start a Blog Course so you can read it as you have time.
{form}
1. Choose Your Platform
Before you do anything else, you need to decide on your blogging platform.
There are lots to choose from: Blogger, WordPress, Squarespace, Tumble, etc.
However, more than 72 million blogs use WordPress as their platform, which makes it the clear choice when starting your blog. My websites are all built on WordPress. Here's why:
- It's free: Layouts, the platforms, addons, and many other features are free for all users – unlike many other platforms.
- It's easy to set up.
- It's intuitive: even a newbie to blogging can learn WordPress easily.
- It's secure: WordPress is constantly updating the platform and security measures to keep your website safe. Every website will eventually come under attack, and when that happens, you want yours to be hosted on WordPress.
- It's customizable: WordPress is the most flexible blogging platform in the world. The options to make your site do and look exactly as you want are endless.
Just stick with WordPress. You won't regret it.
2. Choose your domain name and hosting.
This is where it gets fun! To set up your self-hosted blog with your own domain name you will need:
Domain Name: the name address at which you will be found on the internet. For example, facebook's domain is www.facebook.com. So your domain name will be whatever you choose in this format: www.yourblogname.com – except replace that with your actual name :-). Your domain name will usually cost $10-$15, but if you follow this tutorial I'll show you how to get it for free.
Hosting: This is what allows you to make a home for your blog at your domain name. Without it, your domain would be useless. Web hosting costs $2 – $5/month.
Getting your domain name and hosting set up for your blog isn't free, but it is very cheap – and it will be the best investment in your freedom you ever make.
Here is exactly how to set up your domain name and hosting:
Step 1: Decide On A Hosting Package
You may already know that your host provides the server space for all of the graphics, articles, and cool features of your blog, you know how important it is to make the right decision. You get what you pay for, and that is completely true with the hosting company for your blog.
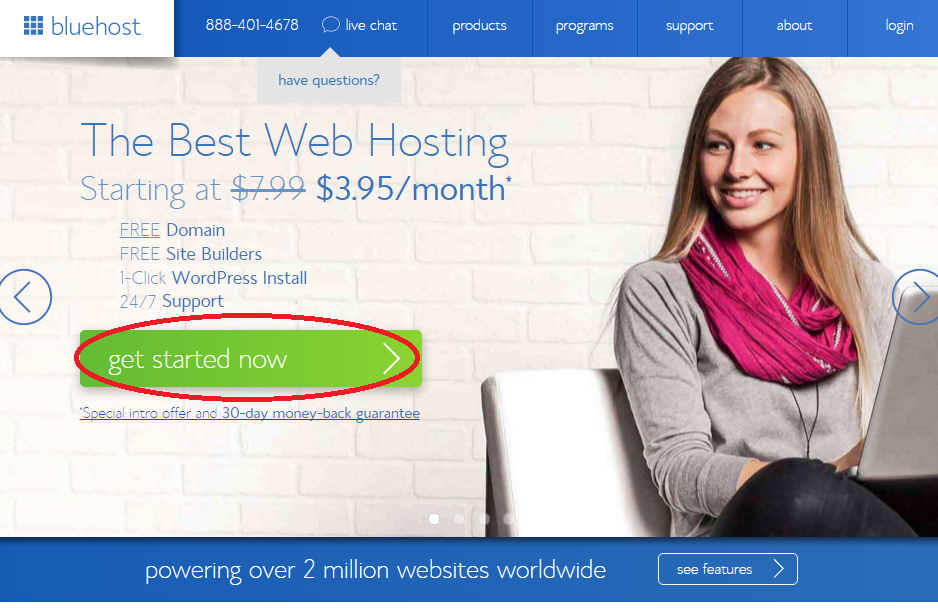
Click here to go to Bluehost and start your blog. Going through my link will get you super low pricing from Bluehost, free WordPress, and even your FREE domain name. I've set it up so that this link will open in a new tab, so you can keep this page open to guide you through the process. Don't worry, the whole thing only takes about 10 minutes because Bluehost makes it so easy.
From Bluehost's front page, click the circled “get started now” button.
After you click the get started now button, you will be presented with several options: the Starter, Performance, and Business Pro. Don't let the options intimidate you, all you'll really need to start a blog is the Starter option.
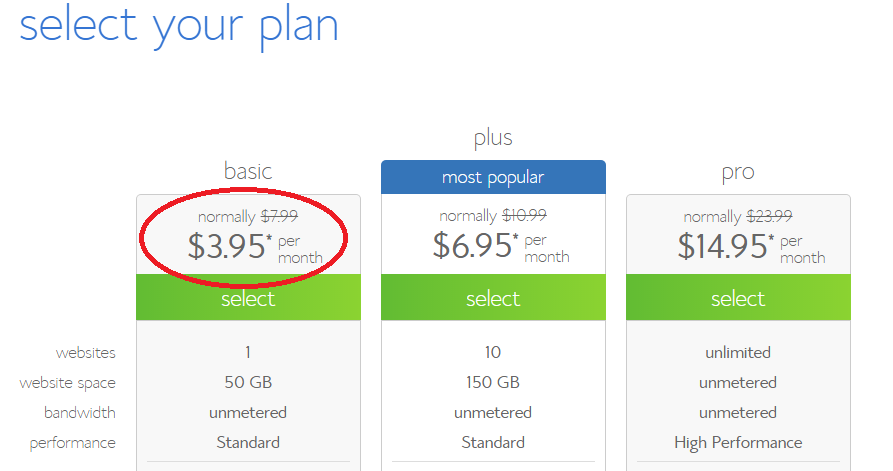
Even the Starter package comes with a free domain, so when you are just starting out or if money is tight, there is no reason to choose a more expensive plan. If (when!) you blog starts receiving lots of traffic, you can always upgrade with the click of a button. Again, Bluehost prides themselves on making starting a blog easy and accessible.
Click the green “Select” button of the plan to you chose to continue starting your blog.
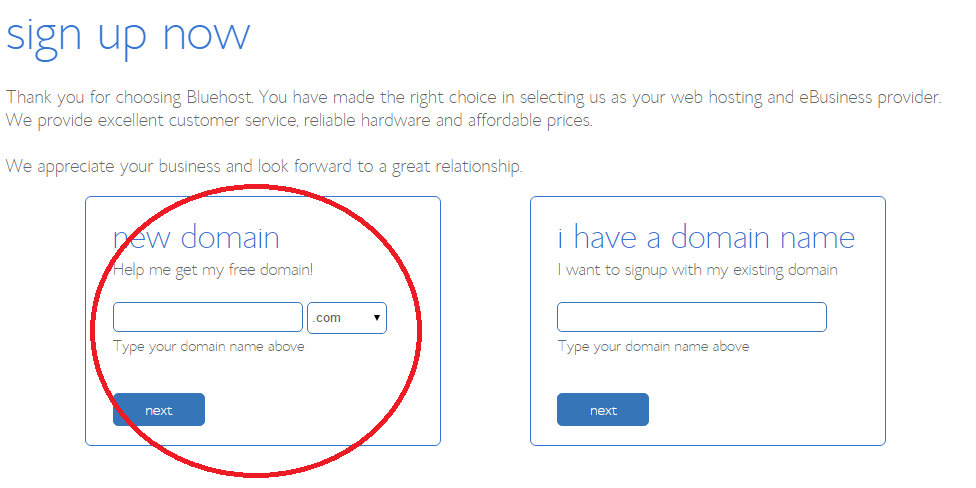
2. Choose Your Domain Name
Your domain is the “www.” address on the internet that people find you at. It's like your street address, except it's on the internet, rather than a physical street. Most commonly, your web address is also the name of your blog. My blog's name is Retired by 40!, so my domain name is www.retiredby40blog.com.
If you've already decided on your domain name and purchased it, this would be the time to enter your existing domain name. You can enter the domain name you already own on the right side of the screen you see below. Bluehost will then walk you through the process of transferring or pointing your existing domain towards Bluehost's servers.
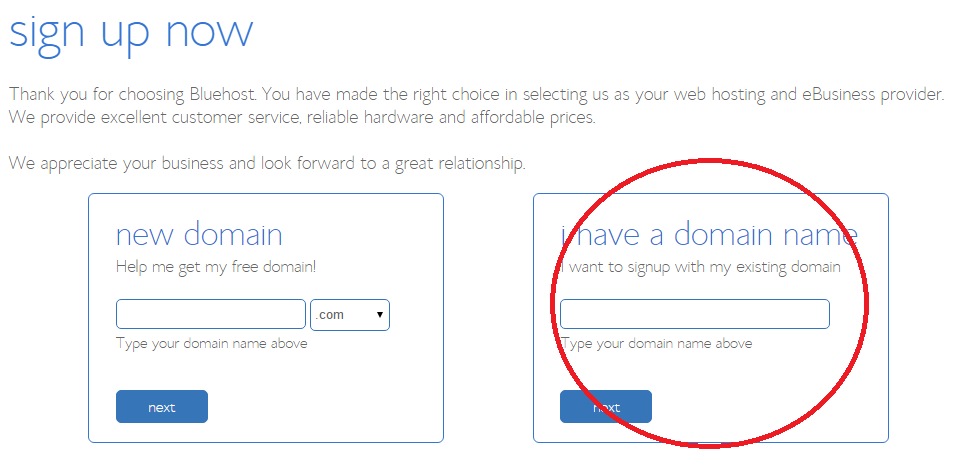
Don't let this scare you if you already own your domain, again, Bluehost makes this process very easy.
The box on the left is for if you have a specific domain name in mind but haven't yet bought it, or you need to come up with your blog's name from scratch.
If you have an idea for your blog name, or even if you don't, you may find that the name is already taken, so if you need some inspiration, check out this cool pin, or this one. Some people even find it helpful to do a “brain dump” (there is got to be a better name for this) which is done by writing down everything you can think of that you want to blog about, including your name, family, location. Then, try combining those words into something catchy, simple, and fun.
Then, run those potential names through the left box during sign-up to see if those names are already taken. It is also usually a good idea to google those blog names to make sure no one is blogging under a similar name to yours.
Next, you will be directed to the account information page, where you will enter your name, address, phone number, and email address. Below that will be where you purchase your actual hosting. There are quite a few options, as you can see below, but I'll walk you through which ones you need and which ones you don't.
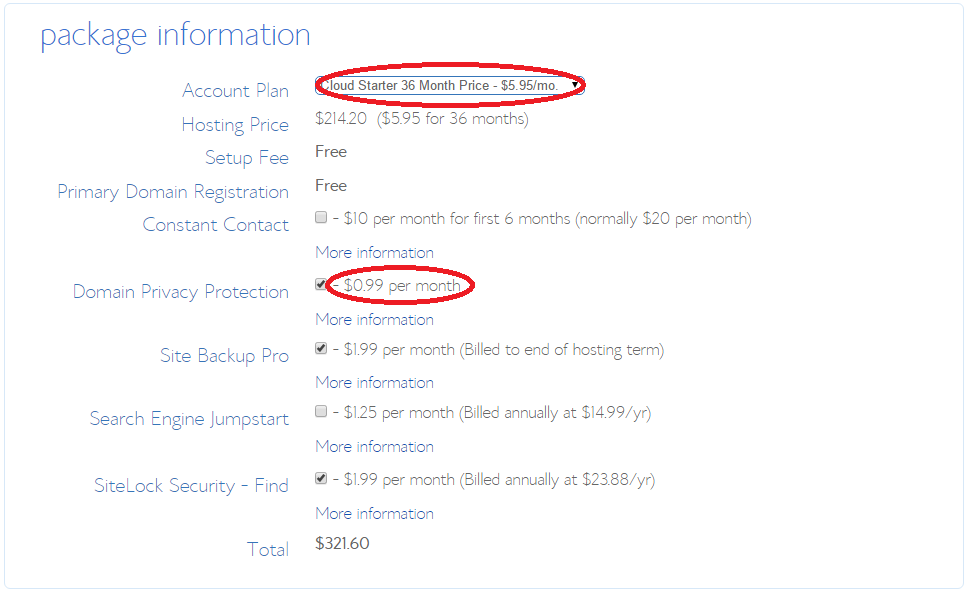
You already chose the Starter package, so that pricing is showing up. The first circle shows where you can choose 12, 24, or 36 months, and the more you buy, the more you save. I suggest signing up for at least 12 months so that you get your FREE domain name with the package.
Below that, there are lots of options, but the only one you really need is the Domain Privacy Protection, which protects your personal information when you register the domain as belonging to you. Just uncheck the other boxes so you don't end up purchasing Site Backup Pro, Search Engine Jumpstart, or SiteLock Security. You don't really need those extras.
Quick Note: The Domain Privacy Protection will only show up if you chose to register a new domain above. If you already own your domain and are transferring it, the Domain Privacy Protection will not show up
Finally, enter your billing information, check the box that says you read the fine print, and hit “Submit.”
Chances are, you'll be asked about upgrades after you hit submit, but don't feel pressured to buy them. Just hit skip to keep moving on the your blog's new control panel.
Next, we'll install WordPress, which will power your site.
3. Install WordPress
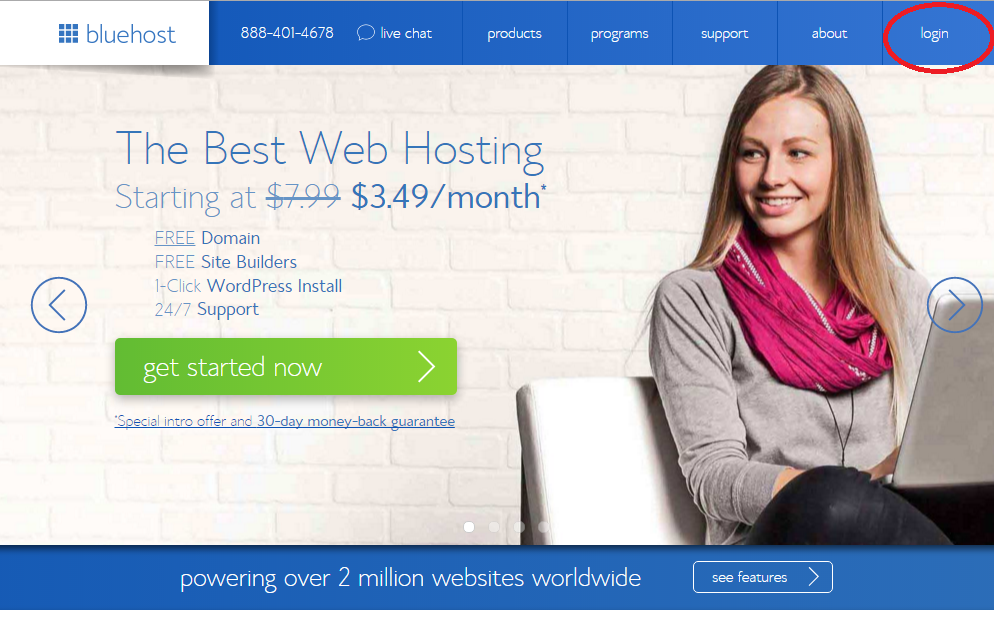
To get started with your blog, you will login to your cPanel (Control Panel) through Bluehost. From the main Bluehost webpage, choose the “Login” option from the top right hand corner. Or, if you've already received your welcome email from Bluehost, you can use the cPanel link they provided in that email.
Your welcome email will contain all of the information you need to login to your cPanel, like your username and password, which you can use to login. Once you're in the cPanel, under Website Builders, you'll see the option to Install WordPress
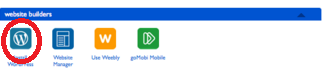
Click Install WordPress, and then “Install” again to install WordPress onto your domain name. You will be prompted to check your domain, which may take a couple of minutes. Then you'll be given the option to install WordPress. Once the installation is complete, you will use WordPress to control the look and feel of your website, as well as use to to write articles. It is the software that will power your website, and it's FREE.
After WordPress is installed, the fun begins! Bluehost will display the admin URL you will use to login to your blog, which is unique to you, so make sure to bookmark this address. Then you will be able to set the username and password that you will login to your blog with.
Security Tip: Stay away from “admin” as your username, since it would be easily guessed by hackers. Also make your password very secure, since hackers can (and will) try to infiltrate your site. Set up a secure blog now so you don't have to worry about it later.
3. Design Time!
Once you reach this point, you should pat yourself on the back, because you now own a corner of the internet. A place where you can be as creative, practical, or social as you like. Even better, you can start changing your family's life by making money with your blog.
There are a few things you can do to get started:
- Install a few basic plugins: Plugins like Akismet, Yoast SEO, WP Super Cache, and more. Instructions for these can be found at my Jumpstart Success Page.
- Control How You Site Looks: Change the theme of your site by going to Appearance > Themes and searching for free WordPress themes that fit the design you have in mind for your blog. Or, if you prefer a paid theme, you can find my favorites on my Recommendations page.
- Finally, work on developing your writing style, color scheme, and other details that will make your blog yours.
4. Writing Posts & Pages
By now you have both a blog and a domain. You're setting it up to look how you want. Congratulations!
Now, I'm going to show you how to add posts and pages to your site
How to add a new post
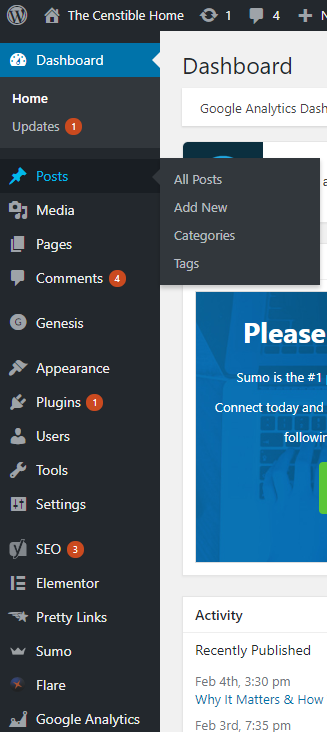
From your WordPress Dashboard, click the “Posts” section on the left-hand menu, then click “Add New”
The next screen will look like this:
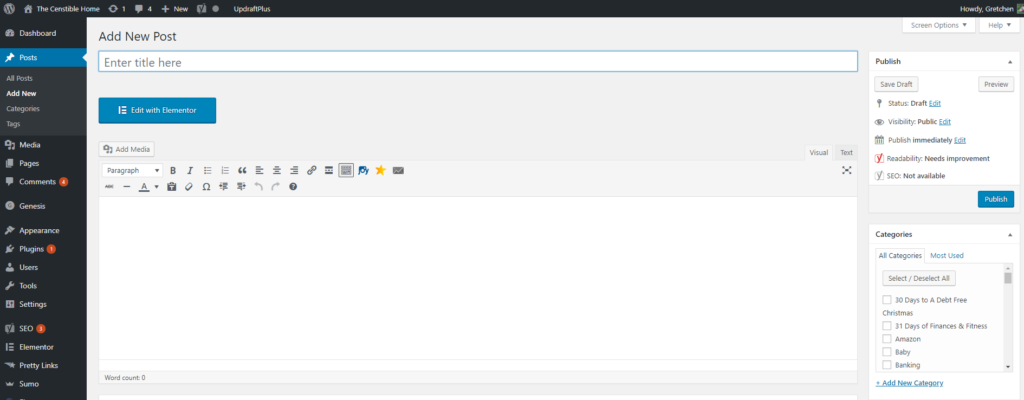
The top box is where to put the title of your post, and the content goes in the big box below.
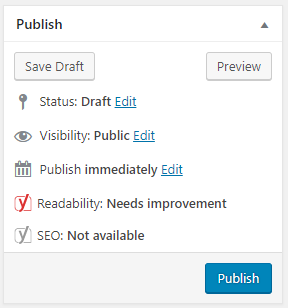
On the right is a box with publishing options. Here, you can save your post as a draft, discard it, or publish. You can also make your post private so only your selected audience can see it.
After you write a post, hit Publish. The post will go live on your site, and can also be found under the Published Posts sections of your WordPress Dashboard
More things to do with posts
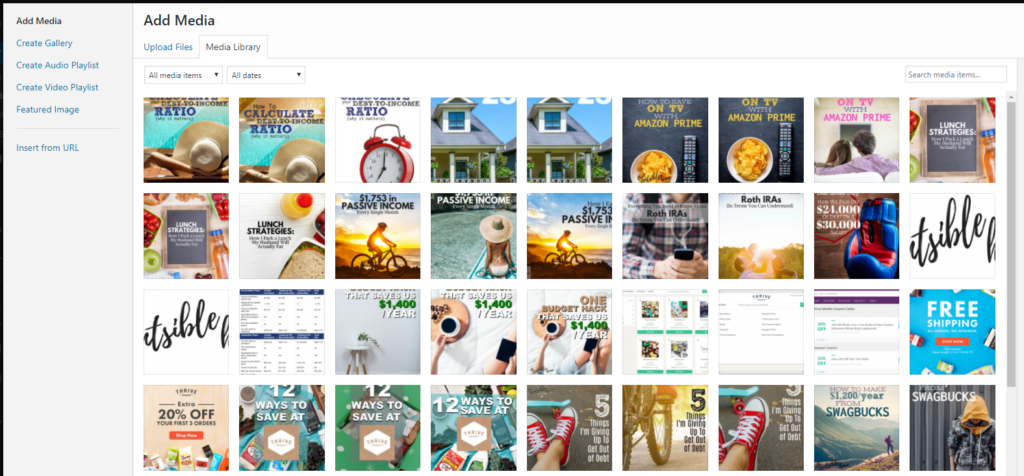
Images can be added to your posts by clicking the “Add Media” button at the top of the post screen.

From there, you can upload an image or choose one from the Media Library
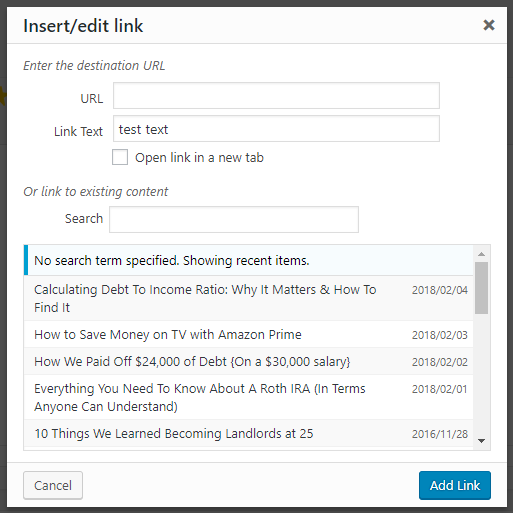
Add a link to your post by highlighting the text you wish to add a hyperlink to, then clicking the “Link” Icon:
This pop-up will come up, and you will be able to choose options for your link:
Add Headings to your posts and pages using the Headings dropdown
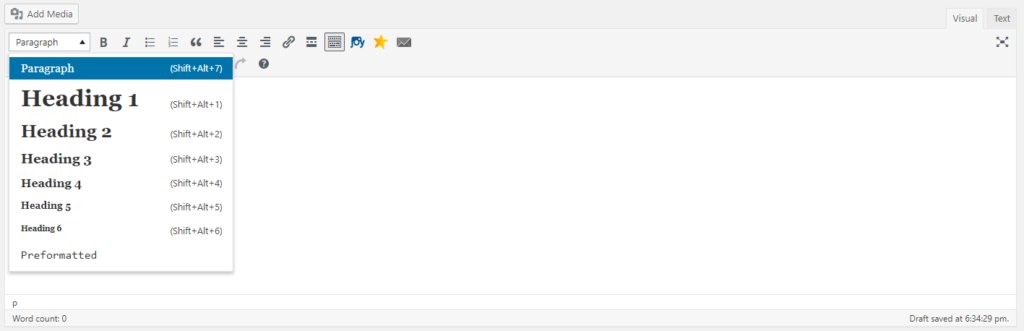
Use Heading 1 once in your blog post, then try to use Headings 2, 3 and 4 as subheadings. Using these headings to structure your blog posts will help with search engine traffic.
5. Growing your blog
You have now set up your blog and you're writing it – that's awesome! You've put in a lot of work to get to this point and deserve a pat on the back!
Here are some ideas to get you started:
Set up your social media and start posting to them:
Add pages to your blog:
- About Me
- Contact Page
More ideas:
- Add a subscription box
- Set up a newsletter
- Set up Google Analytics
- Place ads
- Join affiliate program
This post contains affiliate links. See my disclosures for more information.